# Web Audio & Video (3) Creating Videos in the Browser
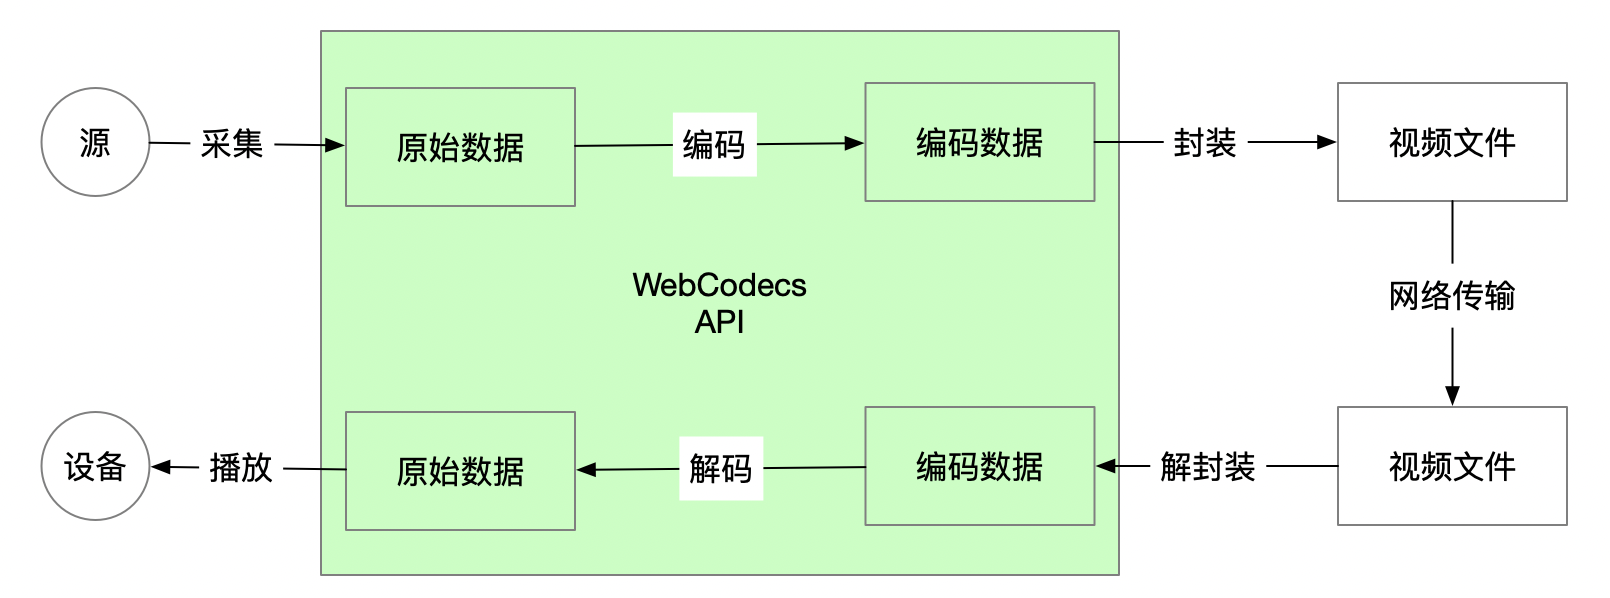
Before WebCodecs, the lack of encoding and decoding capabilities made it nearly impossible to edit or create videos purely in the browser.
WebCodecs fills this gap by providing video creation capabilities directly in the browser.
WebCodecs is expected to revolutionize user habits much like HTML5 technologies (Video, Audio, MSE...) did. While HTML5 transformed video consumption, WebCodecs is set to transform video production.
This chapter covers video creation in the browser. For video parsing, please refer to the previous chapter
You can skip the technical principles and jump directly to WebAV MP4 Creation Example
# Capture and Encoding
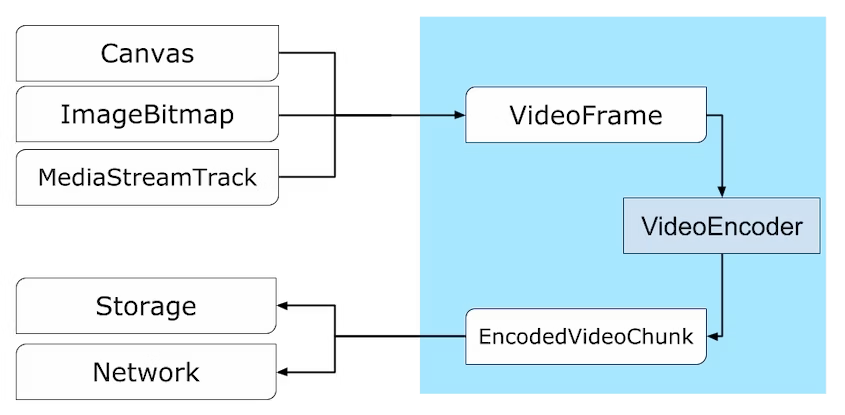
As discussed in previous articles, WebCodecs uses VideoFrame and AudioData to represent raw audio and video data.
Please refer to WebCodecs Core APIs
Common audio and video sources include: MediaStream (camera, microphone, screen sharing), Canvas, Video elements, file streams, etc.
Step One: Convert these source objects into VideoFrame and AudioData objects using these methods:
- Use MediaStreamTrackProcessor (opens new window) to convert MediaStream into
ReadableStream<VideoFrame>andReadableStream<AudioData>(see MDN for example code) - Pass Canvas or Video elements directly to the VideoFrame constructor:
new VideoFrame(canvas) - Obtain VideoFrame and AudioData by decoding local or network files using VideoDecoder and AudioDecoder
- Create AudioData objects from raw audio data obtained from AudioContext (opens new window) (covered in the upcoming Audio Data Processing article)
Step Two: Feed VideoFrame and AudioData into encoders (VideoEncoder, AudioEncoder)
const encoder = new VideoEncoder({
  error: console.error,
  output: (chunk, meta) => {
    // chunk: EncodedVideoChunk waiting for muxing
    // meta: needed for track creation in the next muxing step
  },
});
encoder.configure({
  codec: 'avc1.4D0032', // H264
  width: 1280,
  height: 720,
});

let timeoffset = 0;
let lastTime = performance.now();
setInterval(() => {
  const duration = (performance.now() - lastTime) * 1000;
  encoder.encode(
    new VideoFrame(canvas, {
      // This frame lasts 33ms, duration in μs
      duration,
      timestamp: timeoffset,
    })
  );
  timeoffset += duration;
}, 33);
WARNING
When calling encoder.encode at high frequency, monitor encoder.encodeQueueSize to determine if pausing is necessary. Too many VideoFrames in the queue can exhaust GPU memory and severely impact performance
# Muxing
Encoders (VideoEncoder, AudioEncoder) compress raw data frame by frame and output EncodedVideoChunk and EncodedAudioChunk objects, which are then muxed into video files of the desired format.
We'll continue using mp4box.js to demonstrate MP4 file muxing.
MP4 abstracts each encoded data packet as a Sample, corresponding one-to-one with EncodedVideoChunk and EncodedAudioChunk objects.
Different types of data (audio, video) are grouped into Tracks, managing different types of Samples.
Code Example
const file = mp4box.createFile()
// Create video track
const videoTrackId = file.addTrack({
  timescale: 1e6,
  width: 1280,
  height: 720,
  // meta from VideoEncoder output parameters
  avcDecoderConfigRecord: meta.decoderConfig.description
})
// Create audio track
const audioTrackId = file.addTrack({
  timescale: 1e6,
  samplerate: 48000,
  channel_count: 2,
  type: 'mp4a' // AAC
  // meta from AudioEncoder output parameters
  description: createESDSBox(meta.decoderConfig.description)
})

/**
 * Convert EncodedAudioChunk | EncodedVideoChunk to MP4 addSample parameters
 */
function chunk2MP4SampleOpts (
  chunk: EncodedAudioChunk | EncodedVideoChunk
): SampleOpts & {
  data: ArrayBuffer
} {
  const buf = new ArrayBuffer(chunk.byteLength)
  chunk.copyTo(buf)
  const dts = chunk.timestamp
  return {
    duration: chunk.duration ?? 0,
    dts,
    cts: dts,
    is_sync: chunk.type === 'key',
    data: buf
  }
}

// VideoEncoder output chunk
const videoSample = chunk2MP4SampleOpts(chunk)
file.addSample(videoTrackId, videoSample.data, videoSample)

// AudioEncoder output chunk
const audioSample = chunk2MP4SampleOpts(chunk)
file.addSample(audioTrackId, audioSample.data, audioSample)
This code demonstrates the relationship between key processes and APIs. However, implementing a complete, working program requires more complex flow control logic and deeper understanding of the MP4 format.
TIP
- Ensure all audio and video tracks (addTrack) are created before calling addSample
- Audio track creation requires a
description(esds box), otherwise some players won't play audio
# Generating File Streams
After muxing encoded data with mp4box.js, we have an MP4File object (mp4box.createFile()). Converting this MP4File object to a ReadableStream makes it convenient for saving locally or uploading to a server.
Remember to release memory references to prevent memory leaks
Complete Code Example
export function file2stream(
  file: MP4File,
  timeSlice: number,
  onCancel?: TCleanFn
): {
  stream: ReadableStream<Uint8Array>;
  stop: TCleanFn;
} {
  let timerId = 0;

  let sendedBoxIdx = 0;
  const boxes = file.boxes;
  const tracks: Array<{ track: TrakBoxParser; id: number }> = [];

  const deltaBuf = (): Uint8Array | null => {
    // boxes.length >= 4 means ftyp moov and first moof mdat are complete
    // Avoid writing incomplete moov to prevent unrecognizable files
    if (boxes.length < 4 || sendedBoxIdx >= boxes.length) return null;

    if (tracks.length === 0) {
      for (let i = 1; true; i += 1) {
        const track = file.getTrackById(i);
        if (track == null) break;
        tracks.push({ track, id: i });
      }
    }

    const ds = new mp4box.DataStream();
    ds.endianness = mp4box.DataStream.BIG_ENDIAN;

    for (let i = sendedBoxIdx; i < boxes.length; i++) {
      boxes[i].write(ds);
      delete boxes[i];
    }
    // Release references to prevent memory leaks
    tracks.forEach(({ track, id }) => {
      file.releaseUsedSamples(id, track.samples.length);
      track.samples = [];
    });
    file.mdats = [];
    file.moofs = [];

    sendedBoxIdx = boxes.length;
    return new Uint8Array(ds.buffer);
  };

  let stoped = false;
  let canceled = false;
  let exit: TCleanFn | null = null;
  const stream = new ReadableStream({
    start(ctrl) {
      timerId = self.setInterval(() => {
        const d = deltaBuf();
        if (d != null && !canceled) ctrl.enqueue(d);
      }, timeSlice);

      exit = () => {
        clearInterval(timerId);
        file.flush();
        const d = deltaBuf();
        if (d != null && !canceled) ctrl.enqueue(d);

        if (!canceled) ctrl.close();
      };

      // Safety check if already stopped when start triggers
      if (stoped) exit();
    },
    cancel() {
      canceled = true;
      clearInterval(timerId);
      onCancel?.();
    },
  });

  return {
    stream,
    stop: () => {
      if (stoped) return;
      stoped = true;
      exit?.();
    },
  };
}
These steps complete the process of creating video files in the browser.
Before WebCodecs, frontend developers could only create video files in very limited scenarios using ffmpeg.wasm or MediaRecorder.
Now, WebCodecs enables quick video file creation with precise frame control, providing foundational technical support for diverse product features.
# Web Audio & Video Video Creation Example
While the underlying principles aren't complex (as illustrated in the first two diagrams), implementing from scratch requires handling many details and deeper knowledge of MP4 file formats.
You can skip the details and use @webav/av-cliper's utility functions recodemux and file2stream to quickly create video files.
Here's an example of creating video from canvas:
import { recodemux, file2stream } from '@webav/av-cliper';

const muxer = recodemux({
  video: {
    width: 1280,
    height: 720,
    expectFPS: 30,
  },
  // Audio handling covered in upcoming articles
  audio: null,
});

let timeoffset = 0;
let lastTime = performance.now();
setInterval(() => {
  const duration = (performance.now() - lastTime) * 1000;
  muxer.encodeVideo(
    new VideoFrame(canvas, {
      // This frame lasts 33ms, duration in μs
      duration,
      timestamp: timeoffset,
    })
  );
  timeoffset += duration;
}, 33);

const { stream } = file2stream(muxer.mp4file, 500);
// upload or write stream
Try the video creation DEMO (opens new window) with different materials; Check out detailed recodemux examples (opens new window)
# Appendix
- WebAV (opens new window) Audio & video processing SDK built on WebCodecs
- mp4box.js (opens new window) MP4 muxing/demuxing tool for browsers
- VideoEncoder (opens new window)
- AudioContext (opens new window)
- MediaStreamTrackProcessor (opens new window)