# Web Audio & Video (4) Processing Audio in the Browser
Why dedicate a chapter to audio processing?
- There's a scarcity of audio processing resources online, with most examples focusing on video while glossing over audio, leaving many searching for audio processing examples
- For frontend developers, audio processing is slightly more complex than video processing
Therefore, this article specifically focuses on audio data, providing a comprehensive guide to the entire capture-process-encode-mux workflow to help beginners get started.
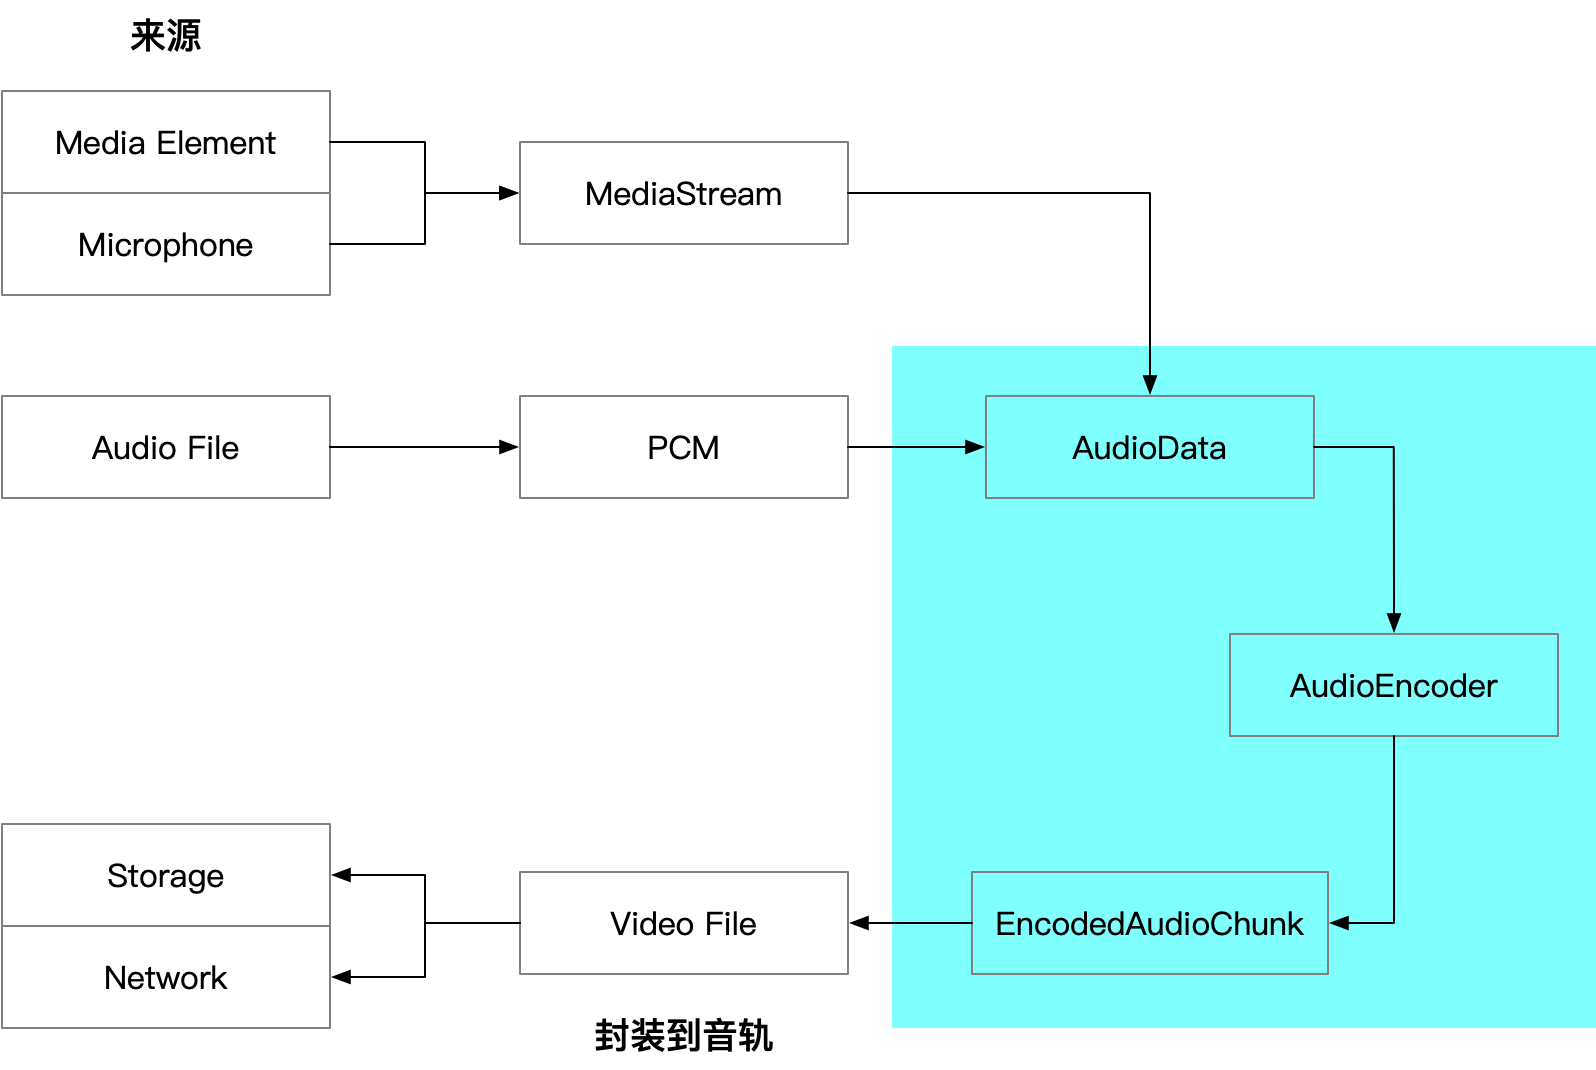 The above diagram shows the general workflow from audio capture to file muxing in the Web.
You can skip the technical principles and jump directly to WebAV Audio Encoding and Muxing Example
# Capture
# Digitizing Sound Waves
Sound is essentially a wave. When sampling a continuous sound wave, each point is represented by a floating-point number, thus digitizing sound into a floating-point array. In JavaScript, Float32Array is commonly used to store these digitized floating-point arrays.
Note: Any numeric array type can describe sound waves; we'll use Float32Array to represent PCM data throughout this article
If you're unfamiliar with audio, waves, and digitization concepts, we strongly recommend experiencing Waveforms (opens new window)
After digitizing (Pulse Code Modulation, PCM) a sound segment into Float32Array, several essential attributes are needed to describe this data:
- SampleRate: The frequency at which the wave is sampled; 48KHz means 48,000 samples per second
- ChannelCount: The number of sound sources; for example, two waves (stereo) after sampling will yield two
Float32Arrays, typically concatenated into a singleFloat32Arraywith the left channel data in the first half and right channel data in the second half
*Why no duration attribute?*
Because duration can be calculated using ChannelCount and SampleRate:
duration = Float32Array.length / ChannelCount / SampleRate
For example, if a mono audio data (Float32Array) has a length of 96000 and a SampleRate of 48KHz,
then the duration is: 96000 / 1 / 48000 = 2 seconds
# Sound Data (Float32Array) Sources
Here are three main audio sources and their conversion processes to Float32Array:
- Local or network audio file ->
ArrayBuffer->AudioContext.decodeAudioData->Float32Array Video or Audio Element->MediaElement.captureStream()->MediaStream->MediaStreamTrack->MediaStreamTrackProcessor->AudioData->Float32Array- Microphone, screen sharing ->
MediaStream-> ...(same as above)
The conversion process isn't complex, but it involves numerous APIs. Once you obtain the Float32Array, you can proceed to processing.
# Processing
Image processing has much higher computational complexity and relies on hardware acceleration. While frontend developers are familiar with drawing to canvas and using corresponding APIs, audio processing might feel less familiar.
Here are some common examples to help you understand audio processing logic. You can either write code to edit audio data or utilize existing Web Audio API features (like resampling).
# Web Audio API
The Web Audio API provides a powerful and versatile system for controlling audio on the Web, allowing developers to choose audio sources, add effects to audio, create audio visualizations, apply spatial effects (like panning), and more.
Let's first mention the Web Audio API (opens new window), which includes numerous APIs for creating and processing audio in the Web. We'll use a few of these APIs but won't cover them extensively. For those interested, check out Zhang Xinxu's article Adding Sound to JS Interactions (opens new window)
# Volume Control
As we learned in high school physics, wave amplitude represents volume. Multiplying by a number changes the amplitude (volume).
Therefore, multiplying a Float32Array by a decimal between 0 and 1 reduces volume, while multiplying by a number greater than 1 increases volume.
for (let i = 0; i < float32Arr.length; i++) float32Arr[i] *= 0.5;
This is the basic principle, but human perception of volume is logarithmic rather than linear. Actual volume control is more complex; read more about PCM Volume Control (opens new window)
# Mixing
Since sound is essentially waves, mixing multiple sounds means adding waves together. Simple addition works:
float32Arr1 + float32Arr2 => outFloat32Arr
const len = Math.max(float32Arr1.length, float32Arr2.length);
const outFloat32Arr = new Float32Array(len);
for (let i = 0; i < len; i++)
  outFloat32Arr[i] = (float32Arr1[i] ?? 0) + (float32Arr2[i] ?? 0);
# Fade In/Out
A common scenario is when clicking to pause music: the volume gradually decreases to 0 instead of abruptly stopping.
Many years ago, music players didn't implement sound fade-out. Today, we rarely experience that jarring sensation of sound suddenly disappearing.
Let's say we need to truncate an audio file and want to make the ending of the first half less abrupt by fading out the last 0.5s. The audio sample rate is 48KHz.
// Generate 1s of random PCM data
const pcmF32Arr = new Float32Array(
  Array(48000)
    .fill(0)
    .map(() => Math.random() * 2 - 1)
);
// Starting position 0.5s from the end (sampleRate / 2)
const start = pcmF32Arr.length - 1 - 48000 / 2;
for (let i = 0; i < 48000 / 2; i += 1)
  // Gradually reduce volume
  pcmF32Arr[start + i] *= 1 - i / 48000 / 2;
# Resampling
When input audio sample rate differs from output, or when mixing audio with different sample rates, resampling is necessary to change the audio's sample rate.
Resampling works by sampling or interpolating the Float32Array.
For example, 48KHz audio has 48,000 points (numbers) per second. Reducing to 44.1KHz means removing 48000 - 44100 points per second.
In the Web, AudioContext and OfflineAudioContext APIs provide resampling capabilities, allowing us to resample audio without implementing the algorithms ourselves.
Using OfflineAudioContext for Audio Resampling
/**
 * Audio PCM Resampling
 * @param pcmData PCM
 * @param curRate Current sample rate
 * @param target { rate: Target sample rate, chanCount: Target channel count }
 * @returns PCM
 */
export async function audioResample (
  pcmData: Float32Array[],
  curRate: number,
  target: {
    rate: number
    chanCount: number
  }
): Promise<Float32Array[]> {
  const chanCnt = pcmData.length
  const emptyPCM = Array(target.chanCount)
    .fill(0)
    .map(() => new Float32Array(0))
  if (chanCnt === 0) return emptyPCM

  const len = Math.max(...pcmData.map(c => c.length))
  if (len === 0) return emptyPCM

  const ctx = new OfflineAudioContext(
    target.chanCount,
    (len * target.rate) / curRate,
    target.rate
  )
  const abSource = ctx.createBufferSource()
  const ab = ctx.createBuffer(chanCnt, len, curRate)
  pcmData.forEach((d, idx) => ab.copyToChannel(d, idx))

  abSource.buffer = ab
  abSource.connect(ctx.destination)
  abSource.start()

  return extractPCM4AudioBuffer(await ctx.startRendering())
}
WebAV audioResample function source code (opens new window)
TIP
In WebWorker environments where OfflineAudioContext isn't available, you can use JavaScript-based audio resampling libraries like wave-resampler (opens new window)
import { resample } from 'wave-resampler';
// The Worker scope does not have access to OfflineAudioContext
if (globalThis.OfflineAudioContext == null) {
  return pcmData.map(
    (p) =>
      new Float32Array(
        resample(p, curRate, target.rate, { method: 'sinc', LPF: false })
      )
  );
}
# Audio Encoding
Since AudioEncoder (opens new window) can only encode AudioData (opens new window) objects, we need to first convert Float32Array to AudioData.
new AudioData({
  // Time offset for current audio segment
  timestamp: 0,
  // Stereo
  numberOfChannels: 2,
  // Frame count (number of data points); for stereo, divide by 2 as data is split between left and right channels
  numberOfFrames: pcmF32Arr.length / 2,
  // 48KHz sample rate
  sampleRate: 48000,
  // Usually means 32-bit interleaved channels; see AudioData docs for more formats
  format: 'f32-planar',
  data: pcmF32Arr,
});
Creating and initializing the audio encoder:
const encoder = new AudioEncoder({
  output: (chunk) => {
    // EncodedAudioChunk output from encoding (compression)
  },
  error: console.error,
});

encoder.configure({
  // AAC encoding format
  codec: 'mp4a.40.2',
  sampleRate: 48000,
  numberOfChannels: 2,
});

// Encode the AudioData
encoder.encode(audioData);
TIP
Remember to check compatibility using AudioEncoder.isConfigSupported before creating the encoder
# Muxing
We'll continue using mp4box.js to demonstrate muxing EncodedAudioChunk
Main Code
const file = mp4box.createFile();
const audioTrackId = file.addTrack({
  timescale: 1e6,
  samplerate: 48000,
  channel_count: 2,
  hdlr: 'soun',
  // mp4a is the container format, corresponding to AAC codec
  type: 'mp4a',
  // meta from AudioEncoder output parameters
  // Without this field, Windows Media Player won't play audio
  description: createESDSBox(meta.decoderConfig.description),
});

/**
 * Convert EncodedAudioChunk | EncodedVideoChunk to MP4 addSample parameters
 */
function chunk2MP4SampleOpts(
  chunk: EncodedAudioChunk | EncodedVideoChunk
): SampleOpts & {
  data: ArrayBuffer,
} {
  const buf = new ArrayBuffer(chunk.byteLength);
  chunk.copyTo(buf);
  const dts = chunk.timestamp;
  return {
    duration: chunk.duration ?? 0,
    dts,
    cts: dts,
    is_sync: chunk.type === 'key',
    data: buf,
  };
}

// AudioEncoder output chunk
const audioSample = chunk2MP4SampleOpts(chunk);
file.addSample(audioTrackId, audioSample.data, audioSample);
Due to length constraints, see createESDSBox source code (opens new window) for the above code's dependency
If you're implementing audio muxing yourself, note:
- mp4box.js still has unfixed bugs in ESDS Box creation, see details (opens new window)
- Data (addSample) can only be added after both audio and video tracks (addTrack) are created, and track creation requires meta data from encoders (VideoEncoder, AudioEncoder). See synchronized audio/video track creation (opens new window) code
- Audio data timing (
Sample.cts) apparently can't control audio offset. For silent periods, you still need to fill data, e.g., 10s of silent PCM data:
new Float32Array(Array(10 * 48000).fill(0))
# Web Audio & Video Audio Encoding and Muxing Example
Implementing audio encoding and muxing from scratch requires understanding the principles above plus extensive API reading and detail handling.
You can skip the details and use @webav/av-cliper's utility functions recodemux and file2stream to quickly encode and mux audio into video files.
Here's the core code for capturing and muxing audio from a microphone:
import { recodemux, file2stream } from '@webav/av-cliper';

const muxer = recodemux({
  // Video is currently required, see previous article for video frame capture
  video: {
    width: 1280,
    height: 720,
    expectFPS: 30,
  },
  audio: {
    codec: 'aac',
    sampleRate: 48000,
    channelCount: 2,
  },
});

// Write file every 500ms
// upload or write stream
const { stream, stop: stopOutput } = file2stream(muxer.mp4file, 500);

const mediaStream = await navigator.mediaDevices.getUserMedia({
  video: true,
  audio: true,
});
const audioTrack = mediaStream.getAudioTracks()[0];
const reader = new MediaStreamTrackProcessor({
  track: audioTrack,
}).readable.getReader();
async function readAudioData() {
  while (true) {
    const { value, done } = await reader.read();
    if (done) {
      stopOutput();
    }
    await muxer.encodeAudio(value);
  }
}
readAudioData.catch(console.error);
Here's the complete example (opens new window) for recording and exporting MP4 from camera and microphone. Try the DEMO (opens new window) now.
# Appendix
- WebAV (opens new window) Audio & video processing SDK built on WebCodecs
- Camera & Microphone Recording DEMO (opens new window)
- Web Audio API (opens new window)
- Adding Sound to JS Interactions (opens new window)
- PCM Volume Control (opens new window)
- AudioData (opens new window), AudioEncoder (opens new window)
- WebAV audioResample Source Code (opens new window)
- WebAV createESDSBox Source Code (opens new window)
- wave-resampler (opens new window) PCM audio resampler written entirely in JavaScript