# Web Audio & Video (2) Parsing Video in the Browser
While browsers can already play videos directly, why would we need to write code to parse them manually? The answer lies in specific scenarios that require more detailed video processing, such as extracting keyframes, detecting text in videos, applying person privacy masking, or achieving ultra-low latency video playback.
In essence, except for basic video playback, any video data processing starts with parsing.
You can skip the technical principles and jump directly to WebAV MP4 Parsing Example
# Brief Introduction to MP4
MP4 is one of the most popular and well-supported video container formats across various browsers; This series will use MP4 videos as examples, so let's start with a brief overview of MP4 fundamentals. Other video formats require their corresponding demuxing SDKs
MP4 can be categorized into regular MP4 and Fragment MP4 (opens new window);
In regular MP4, metadata can be placed either before the audio/video data (beneficial for network streaming) or after it;
Fragment MP4 manages audio/video data in small segments, making it ideal for live streaming scenarios and is the only format supported by MSE.

MP4 uses the concept of Boxes to describe and manage data, with different data types abstracted into different Boxes that can be nested;
The image below visualizes a regular MP4 file, where video resolution is stored in moov box -> trak box -> ... -> avc1 box, while encoded (compressed) audio/video data is stored in the mdat box
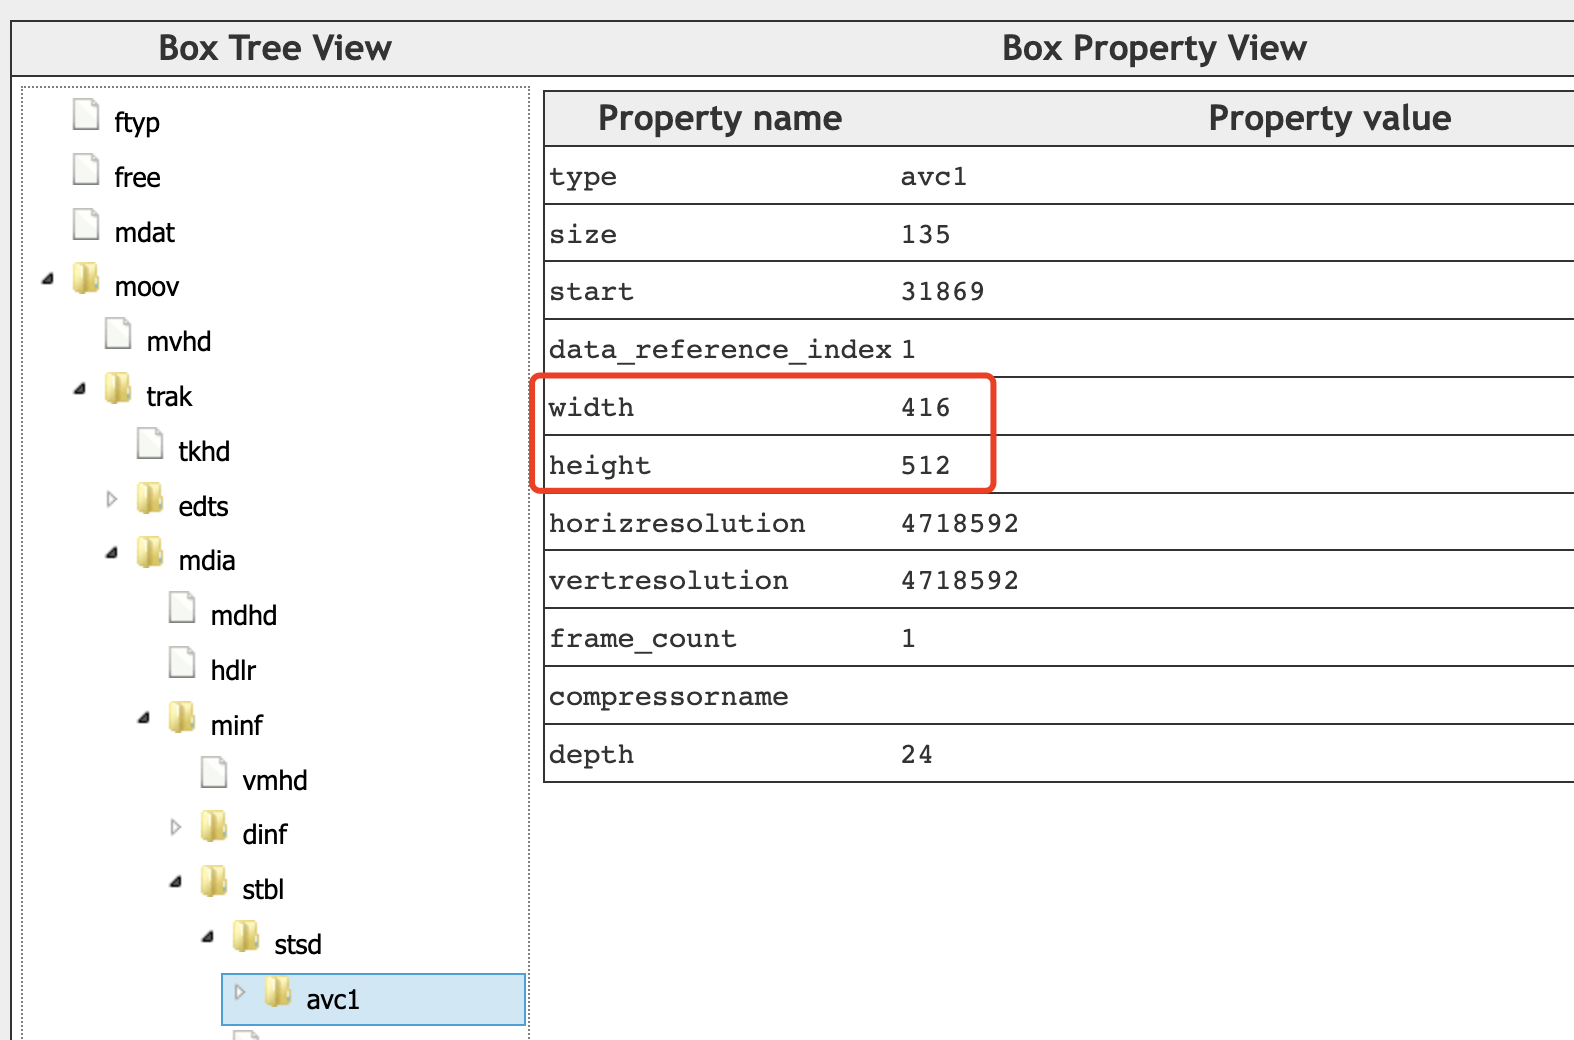
You can visit mp4box.js filereader (opens new window) to visualize MP4 files
# MP4 Demuxing
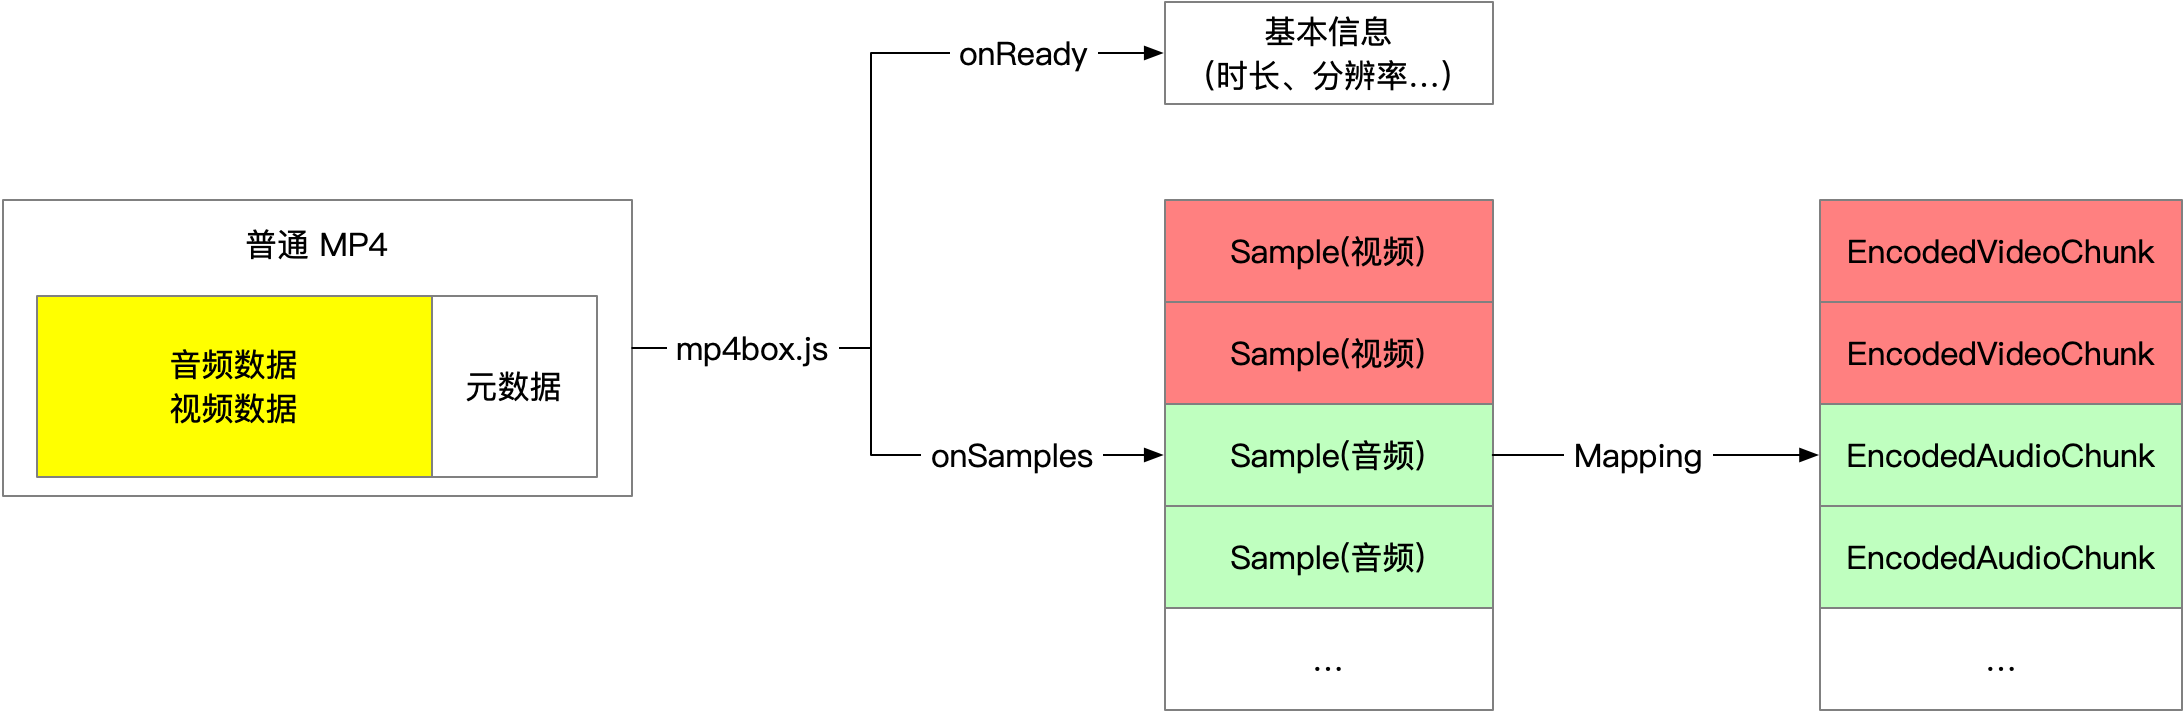
We use mp4box.js (opens new window) to demux MP4 files in the browser;
Demuxing can be understood as extracting metadata from MP4 files and parsing audio/video data into individual packages (Samples) for easier processing.
These MP4 Samples can be converted to EncodedVideoChunk or EncodedAudioChunk.
The SampleTransform (opens new window) in the WebAV project can convert MP4 file streams into Sample streams (ReadableStream)
Use mp4FileStream.pipeThrough(new SampleTransform()) to obtain the Sample stream.
Demuxing Pseudo-code
mp4box.js API Documentation (opens new window)
const file = mp4box.createFile()
file.onReady = info => {
  file.setExtractionOptions(info.videoTracks[0]?.id, 'video')
  file.setExtractionOptions(info.audioTracks[0]?.id, 'audio')

  file.start()
}

file.onSamples = (id, type, samples) => {
  // Convert to `EncodedVideoChunk` or `EncodedAudioChunk`
  const chunks = samples.map(s => new EncodedVideoChunk({
    type: (s.is_sync ? 'key' : 'delta')
    timestamp: (1e6 * s.cts) / s.timescale,
    duration: (1e6 * s.duration) / s.timescale,
    data: s.data
  }))
}

const mp4stream = await fetch('<mp4 url>').body
let inputBufOffset = 0
while (read ui8ArrBuf for mp4stream) {
  const inputBuf = ui8ArrBuf.buffer
  inputBuf.fileStart = inputBufOffset
  inputBufOffset += inputBuf.byteLength
  file.appendBuffer(inputBuf)
}
Demuxing doesn't consume excessive computational resources; JavaScript processing generally won't hit performance bottlenecks. This process is outside WebCodecs' scope.
# Video Decoding
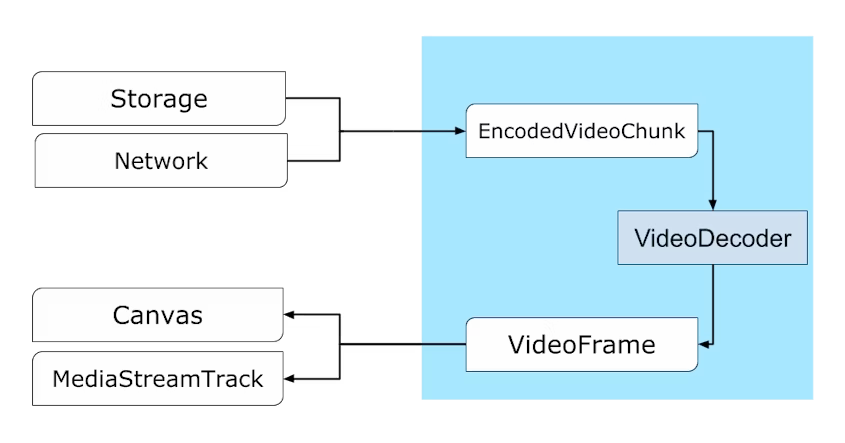
Different videos require corresponding demuxing programs. The demuxed data (like MP4 Samples) can be converted to WebCodecs' EncodedVideoChunk or EncodedAudioChunk, which are then decoded (decompressed) by VideoDecoder or AudioDecoder respectively.
Before using the decoder, initialization configuration (decoder.configure) is required, with the mandatory codec parameter available during demuxing (onReady).
const videoDecoder = new VideoDecoder({
  output: (videoFrame) => {
    // videoFrame can be drawn to Canvas for additional processing
  },
  error: console.error,
});
videoDecoder.configure({ codec: '<codec format matching the video data>' });
TIP
For videoDecoder.configure parameters, please refer to the MDN documentation (opens new window)
While description is a required parameter, documentation is limited. See the author's avcC box content analysis (opens new window)
Decoding video data yields multiple VideoFrame and AudioData objects containing raw frame data. The raw data can be copied to an ArrayBuffer using their copyTo method. Important considerations during processing:
TIP
VideoFramemay consume significant GPU memory; close them promptly to maintain performanceVideoFrame.copyTocopies frame data from GPU to system memory; prefer WebGL for pixel processingVideoFrameoutputs fromVideoDecodermust be closed promptly, or decoding will pause
# Video Frame Processing
In browsers, VideoFrame processing typically involves canvas, for operations such as:
- Reducing video resolution
- Draw
VideoFrameto a lower resolutioncanvas,ctx.draw(videoFrame, 0, 0) - Create new
VideoFrame,new VideoFrame(canvas, {...})
- Draw
- Cropping video frames; use positioning parameters with
ctx.drawto render specific regions - Overlaying videos, images, text; draw
VideoFramefirst, then other elements - Reducing frame rate by selective frame dropping; e.g., 60FPS -> 30FPS by dropping every other frame
- Complex graphics processing like filters, masking, effects; use WebGL or WebGPU
See common video processing DEMO (opens new window)
For re-encoding and packaging processed video frames into files, see the next chapter.
Audio processing will be covered in a dedicated article
# Web Audio & Video Video Parsing Example
While combining mp4box.js demuxing with WebCodecs decoding is conceptually simple, it requires extensive documentation reading, API understanding, and detailed logic implementation.
@webav/av-cliper provides MP4Clip to convert video streams into video frames (VideoFrame), abstracting away many complex details
import { MP4Clip } from '@webav/av-cliper';

// Initialize with an mp4 file stream
const clip = new MP4Clip((await fetch('<mp4 url>')).body);
await clip.ready;

let time = 0;
// Render all video frames at maximum speed
while (true) {
  const { state, video: videoFrame } = await clip.tick(time);
  if (state === 'done') break;
  if (videoFrame != null && state === 'success') {
    ctx.clearRect(0, 0, cvs.width, cvs.height);
    // Draw to Canvas
    ctx.drawImage(
      videoFrame,
      0,
      0,
      videoFrame.codedWidth,
      videoFrame.codedHeight
    );
    // Important: close immediately after use
    videoFrame.close();
  }
  // Time unit is microseconds, ~30fps, dropping excess frames
  time += 33000;
}
clip.destroy();
Try the DEMO (opens new window)
# Appendix
- WebAV (opens new window) Audio & video processing SDK built on WebCodecs
- WebAV Video Processing DEMO (opens new window)
- WebAV Decoding DEMO (opens new window)
- mp4box.js (opens new window) MP4 muxing/demuxing tool for browsers
- mp4box.js filereader (opens new window) MP4 file visualization tool built on mp4box.js
- MDN VideoDecoder Documentation (opens new window)
- MP4 avcC box Analysis and VideoDecoder Initialization (opens new window)